
Developing with Dogfish Heads SuperEIGHT beer
A few months ago, articles began to pop up with news of a beer that could be used to develop super 8 film. Recently my love for film has spread to the cinema world and I started to shoot super 8 (and 16mm), so this was great news! Developing super 8 at home sounds great! At the very least I could use it to test cameras before I use them on a proper project.
I finally got my hands on Dogfish Heads SuperEIGHT beer and wanted to share my results and recipe(s). There isn’t much information online at the time and only one video from kodak/dogfish head showing sample results.

The instructions to make developer calls for;
- 17 fl oz of SuperEight beer
- 1/2 oz of Vitiman C
- 1 3/4 oz Baking Soda
Sounds simple enough, but after doing research on a similar developing technique using coffee instead of beer, I found that Baking Soda was not used in any recipes. Instead, Washing Soda, which has a similar chemical makeup and similar name, was used. I’m not a chemist but after researching further I chose to use Washing Soda in place of Baking Soda. Please do your own research but as you will see the Washing soda did produce usable images!!
So my recipe became;
- 17 fl oz of SuperEight beer
- 1/2 oz of Vitiman C (crystal/powder found at supermarkets, health food stores etc.)
1 3/4 oz Baking Soda1 3/4 oz Washing Soda
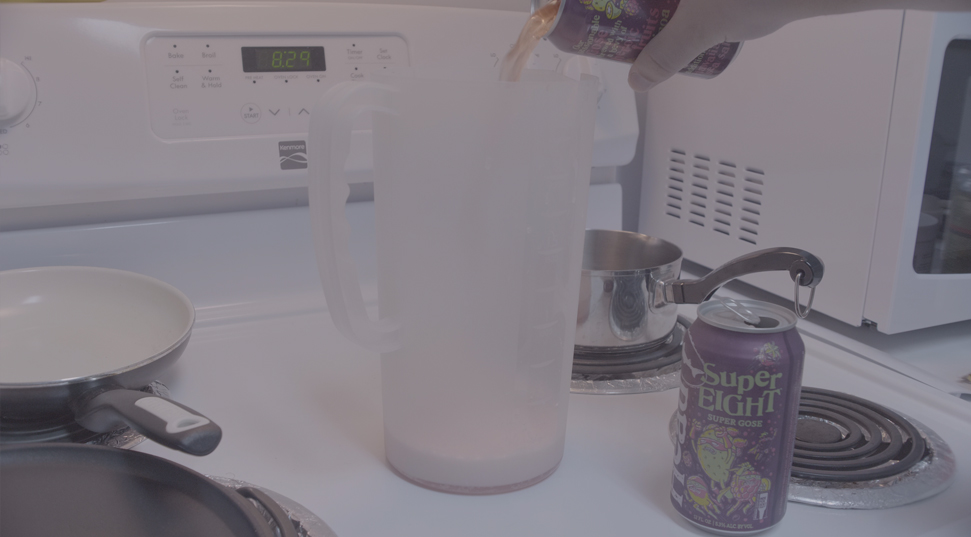
Here’s where I had trouble. 17 fl oz of beer is roughly 1 1/2 cans. When you have that in a 2 gallon bucket(the example in Dogfish Heads instructions), it is not that much liquid. You could use a different bucket (which is what i did), but I wanted to try to stick to the instructions as closely as I could for this first roll. In a 2 gallon bucket the liquid is too shallow to completely submerge the film and will probably lead to improper development. What I recommend is using most of the second can of beer and adding a bit more Vitamin C and Washing Soda to compensate. Also, putting the liquid in a large beaker used for mixing chemicals. I used a 2.5 L beaker. I don’t recommend a smaller sized containers, when following the instructions the next step would be to go into a dark room and process the film in complete darkness. The larger container can help avoid spilling and splashing, which is great because Washing Soda is not something you want on your skin or in your eyes. I would also recommend gloves because you will be agitating the film by hand.

This is the bucket I intended to develop with but it was too shallow so i decided to transfer the finished chemistry to the beaker.
Into the darkroom. Per the instructions, I did not do a water wash, the film went straight into the developer. Using a kitchen timer I would know when my 15 minutes were up. I would definitely recommend some sort of time keeping device or someone to inform you that the developing is done. With gloves on, agitate for 15 minutes. I decided to forgo the stop bath and wash the film with water several times. Having several buckets in a tub with access to water makes this a much easier process in the dark. After the water wash I put the film in a bucket of fixer and half agitated half waited.
After that I washed the film and put it in permawash, followed by a final wash and some photoflow.
These are the results


At first I thought the film was overdeveloped, with it being very dense through out. Upon further inspection there were images! With super 8 being so small it was difficult to tell what was recorded. After scanning it becomes more clear. The film has an old look to it, the type of thing that might appear in the home videos of a character in a movie. Scratches and all the imperfections just cant be replicated digitally in my opinion so it’s a nice touch if that is what you’re looking for.
My developing method
Using the same developer, I decided to try a different approach. I originally did half a roll in the Dogfish Head method intending to use the other half in a more conventional process. So, I put the remaining film in a tank and went through my normal process. Water wash followed by developer (at the same temperature about 74°F). Same 15 minute developing time followed by 2 water washes, fixer, water wash, permawash, final wash, photoflow.
During developing I decided to agitate 30 seconds throughout one minute. The original recipe calls for constant agitation so I thought half of that would be a good starting point. I also agitated a lot more vigorously than usually, making sure the emulation of the film never touched with another part of the film. This could lead to improper development and/or no image being developed in the parts that make contact.


The results are much more pleasing in my opinion, looking like more traditional negatives. A little less extreme, but still has an interesting look. For the full roll of film a 4x 35mm real/2x 120 tank might be better but you will need more chemistry. There aren’t many dedicated super 8 tanks available, it was never really a home dev type of film after all. The only ones I can find are Russian tanks, sold in Russia.


")
This method is much easier, in my opinion, because after loading the film in complete darkness the rest of the process can be done in the light. Anyone with home developing experience should feel comfortable using this method.
Final thoughts
This was a fun experience and I will experiment further but I do have to say Caffenol is a much cheaper alternative with more information and recipes available.
Super 8 is a very niche space within the already niche film community so I found it odd that they would market a beer for developing super 8. After all, it should work on other film stocks as well. The name comes from the “eight heroic ingredients” with super foods like quinoa and elderberry in the mix I can see where they came up with that naming convention. That being said, super 8 is a strange choice as far as film goes. With the only black and white film stock being tri-x reversal, you end up with a negative that cannot be projected. Most people, like me, do not have dedicated machines for digitizing super 8 at home. This is why I can only provide still images from my flat bed scanner (I will send them to be digitized as soon as possible) These choices are puzzling but after all I’m a film lover not a marketing expert. I still have a few cans so I will definitely experiment and report back on what other film stocks and recipes worked for me!
I do not recommend this for people who love beer and only have a slight interest in film. Following Dogfish Heads recipe might be a bit much for a layperson, having to make stop bath and fixer is a bit much for someone new to home developing. And anyone already developing at home has canisters and other equipment…
In the end, it is quite a lot of work, prep etc for someone who might do this just once. If you already have equipment, a darkroom, shoot super 8 and drink craft beer it’s definitely worth a shot. The beer itself is very refreshing, a nice drink for the summer. I’m not typically a fan of Gose style beers, or anything on the sour side, but SuperEight has a well balanced flavor of fruits, tart and a bit of salt that is unique and pleasant.
The developing ingredients are the same found in most Caffenol recipes so I do recommend trying both!
For more info on SuperEIGHT
https://www.dogfish.com/brewery/beer/supereight
Special Thanks to Union Beer Store for always being a good place to drink beer.
Please drink responsibly and responsibly dispense of photographic chemicals!
* Also developing with alcohol has been done before; http://www.caffenol.org/?s=wine but I could not find anything on developing with beer prior to Dogfish Heads SuperEight.


